The mapping report provides a summary of the mappings produced by Automap Values.
One report is created for each Map Values operation where Automap has been activated.
Overview
Accessing the mapping report
When a pipeline using Automap Values is run, a Mapping Report is produced. Access the Mapping Report from the Outputs Summary.
Understanding the mapping statistics
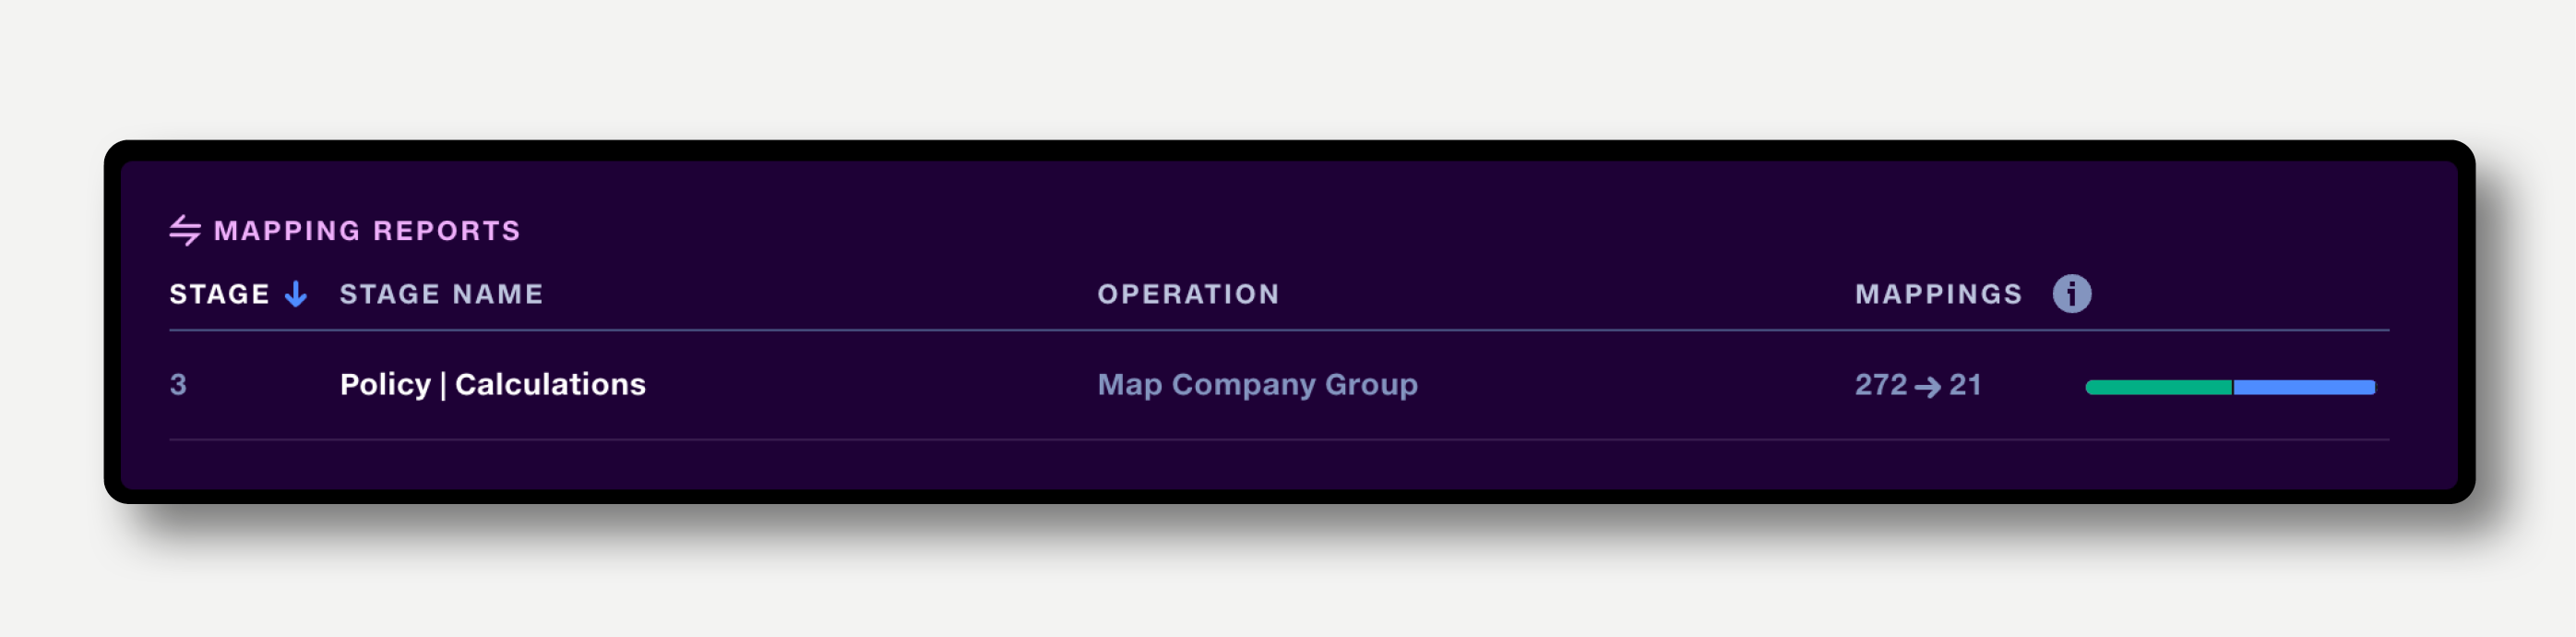
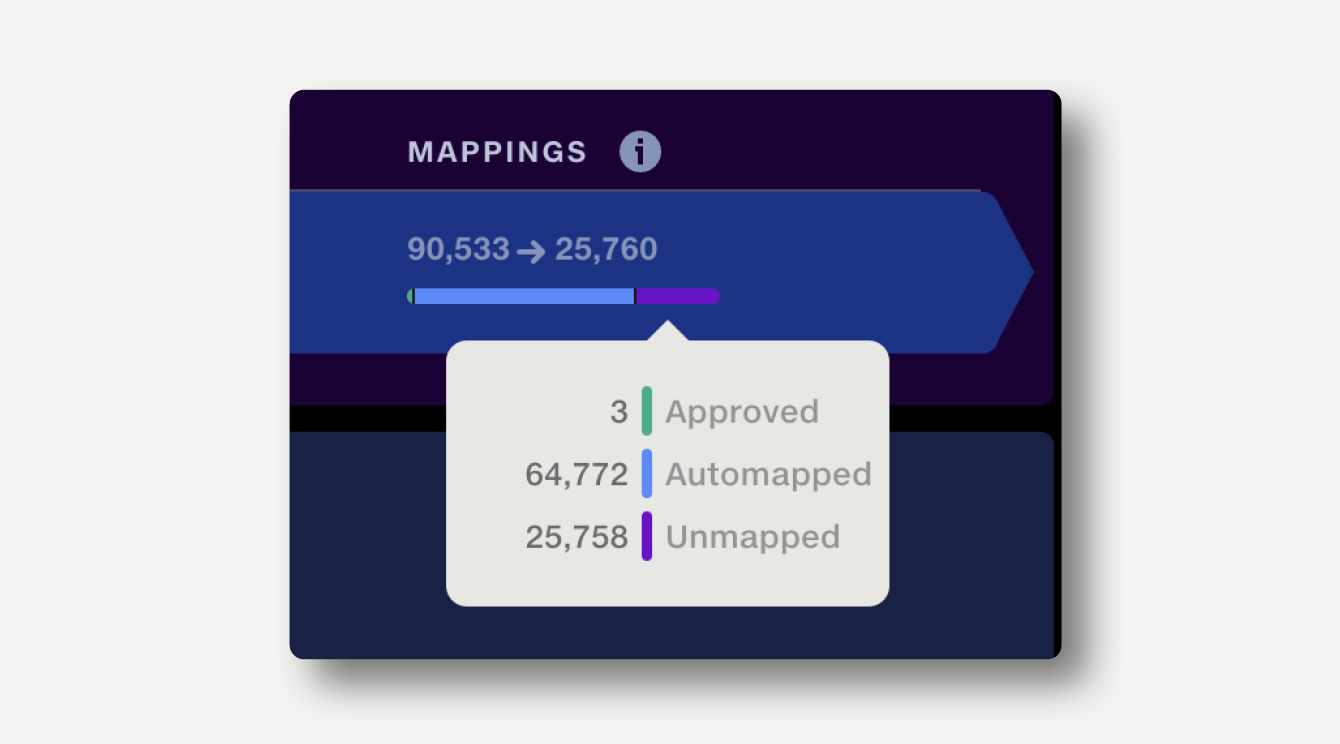
In the outputs view, the mappings column lists the number of distinct values input to the operation and the number of distinct values output.
In the example below, 90,533 distinct values were input and 25,760 values were output.
Note that unmatched items can be set to map to a single value, which will affect the number of output values.
The summary bar shows the proportion of rows which are mapped, automapped and unmapped. Hover over the summary bar to see the number of rows for each category.
In the example below, 3 rows were already approved, 64,772 were automapped and 25,758 were unmatched.
Workspace
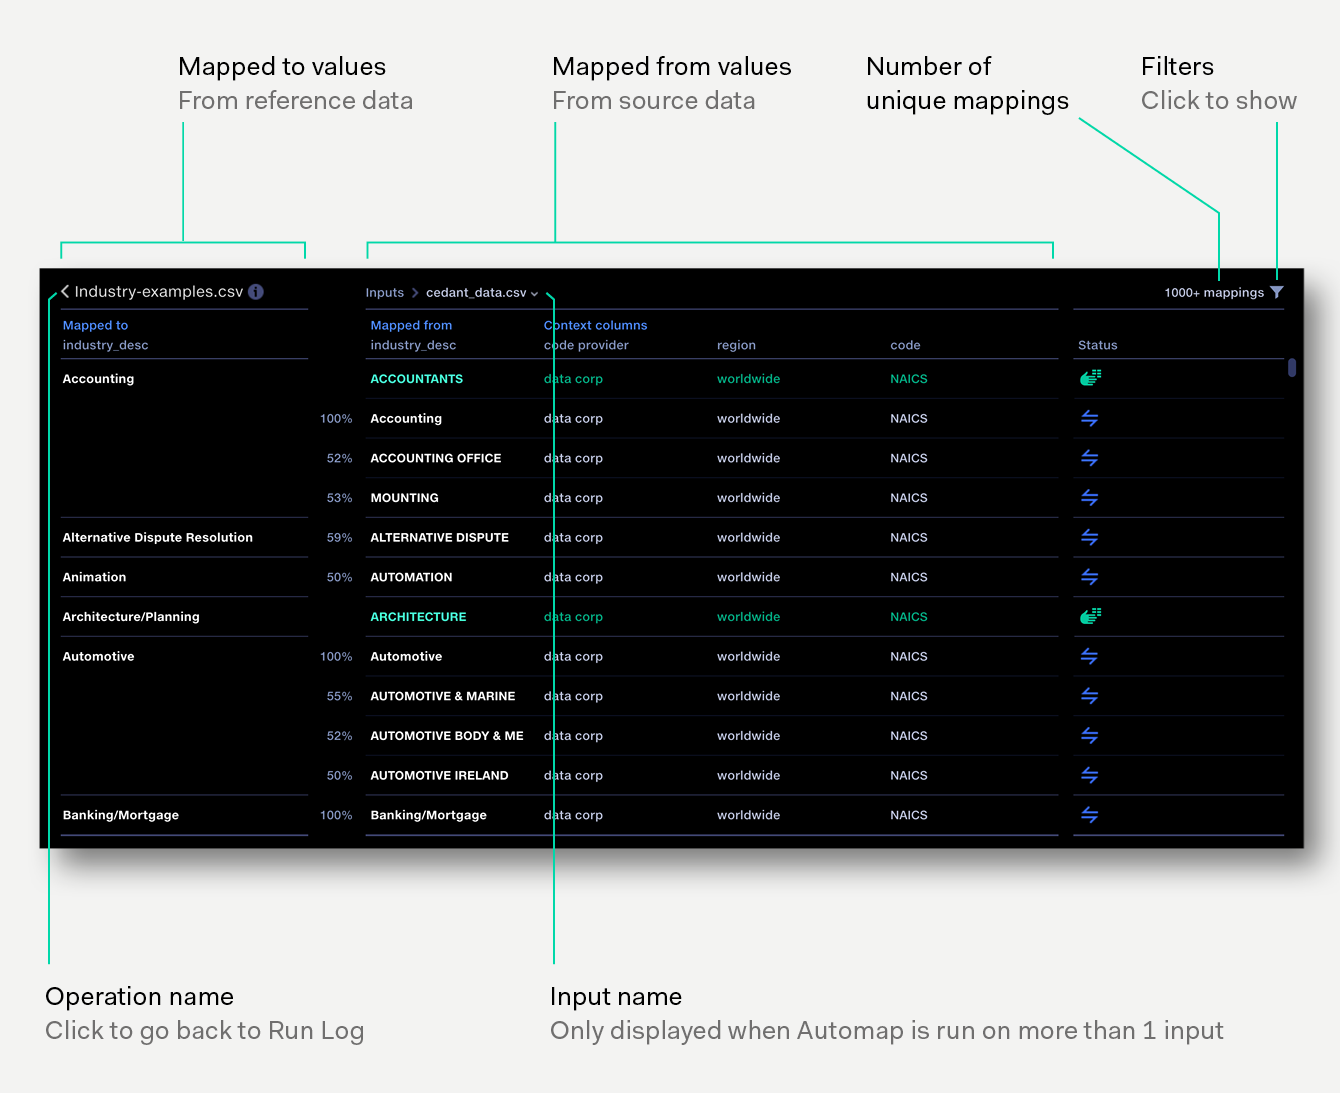
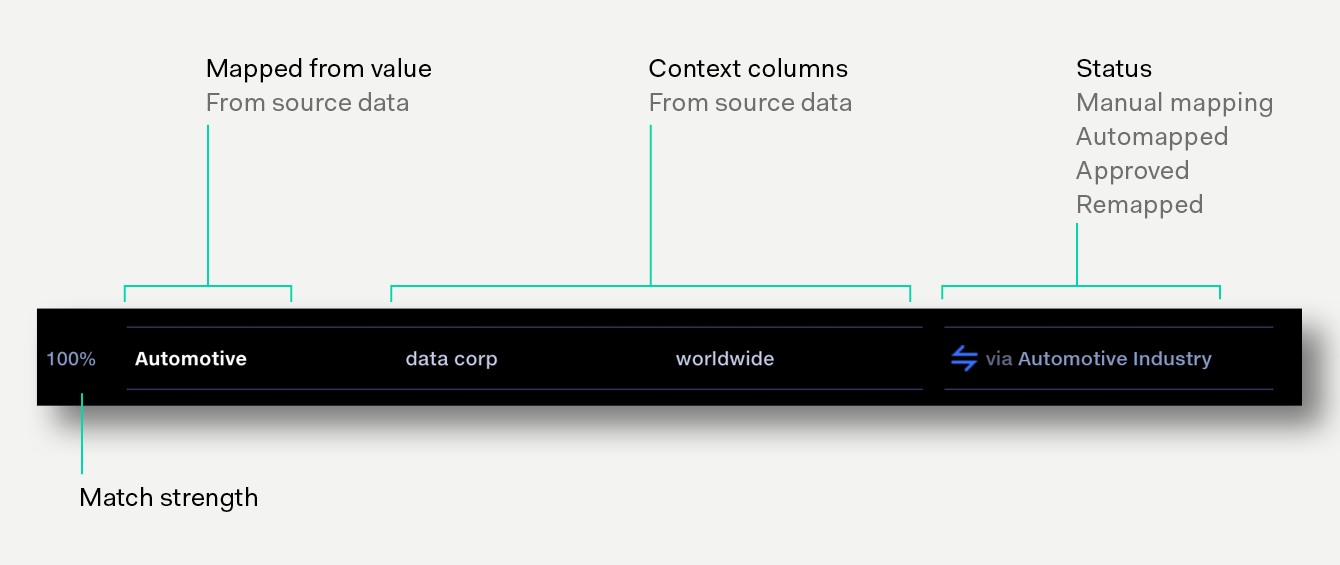
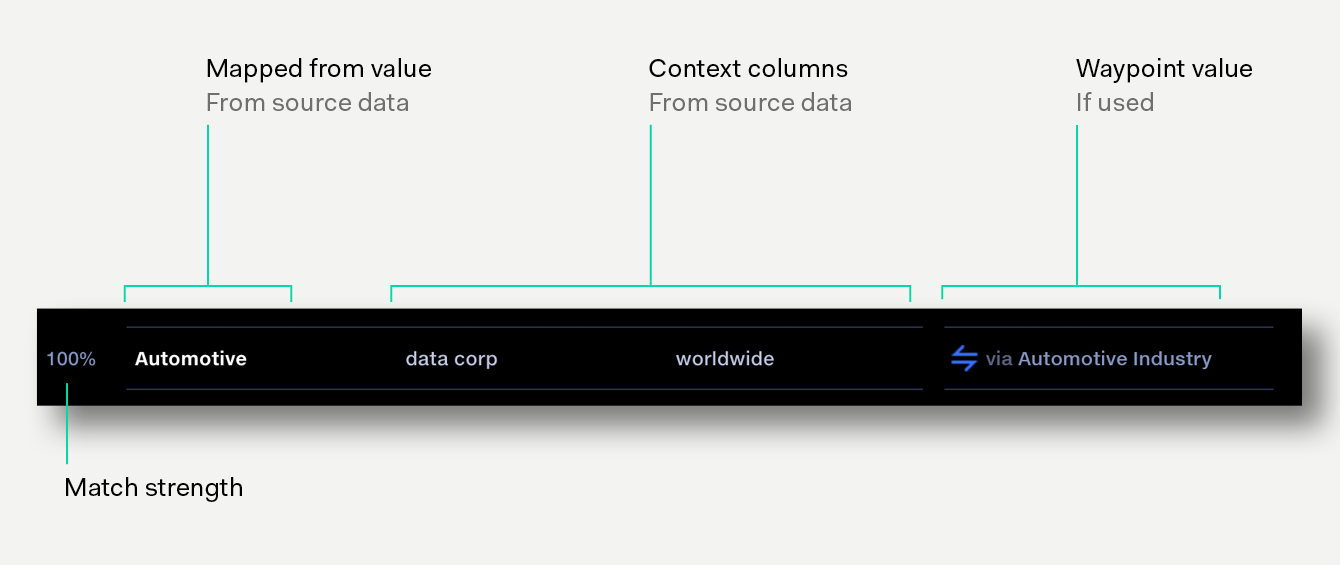
The report shows the ‘mapped to’ values in the reference dataset on the left, and the corresponding ‘mapped from’ values and context columns from the source data on the right,
along with the match strength for each source value.
Number of mappings displayed
The report shows the first 1,000 unique mapped values from your source data. Applying a filter will return the first 1,000 unique mappings matching the filter.
The full set of data has been mapped and can be viewed in a standard format via your pipeline outputs.
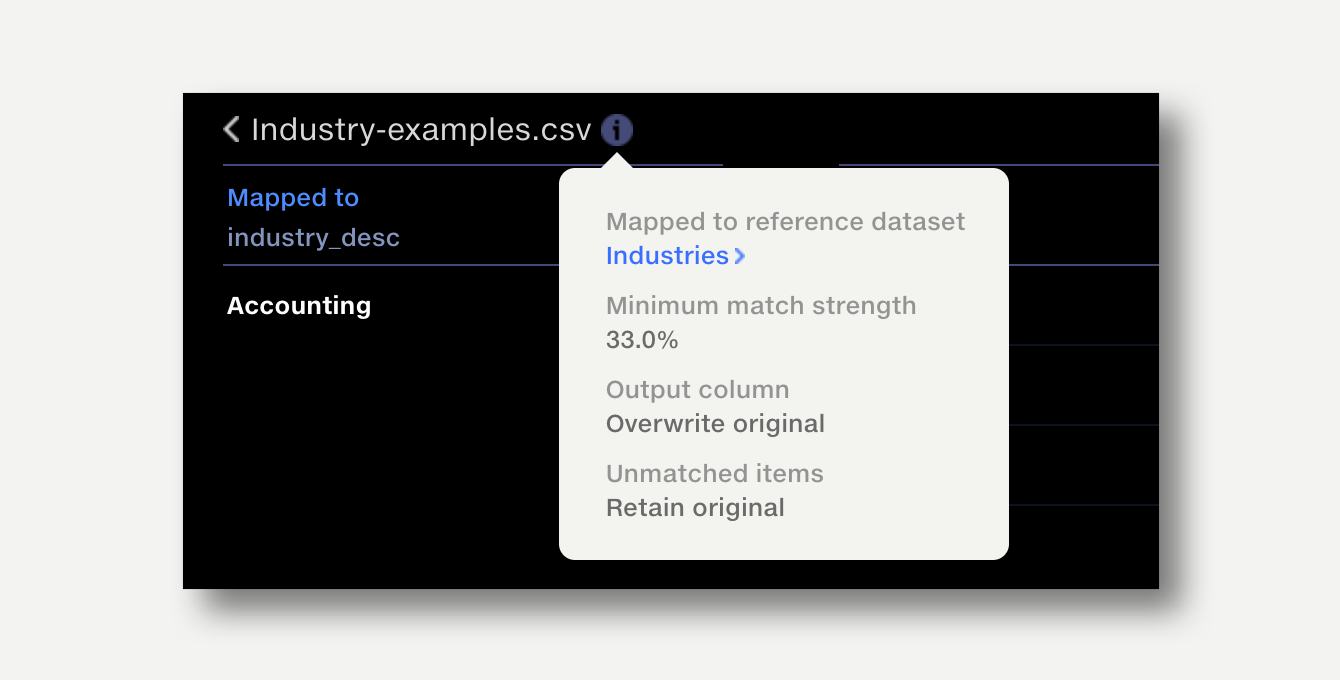
Report metadata
To see information about the Automap configuration which produced a report, click on the report’s info popup, on the top left.
Clicking on the Reference Dataset name will navigate to the dataset in the Data Repo.
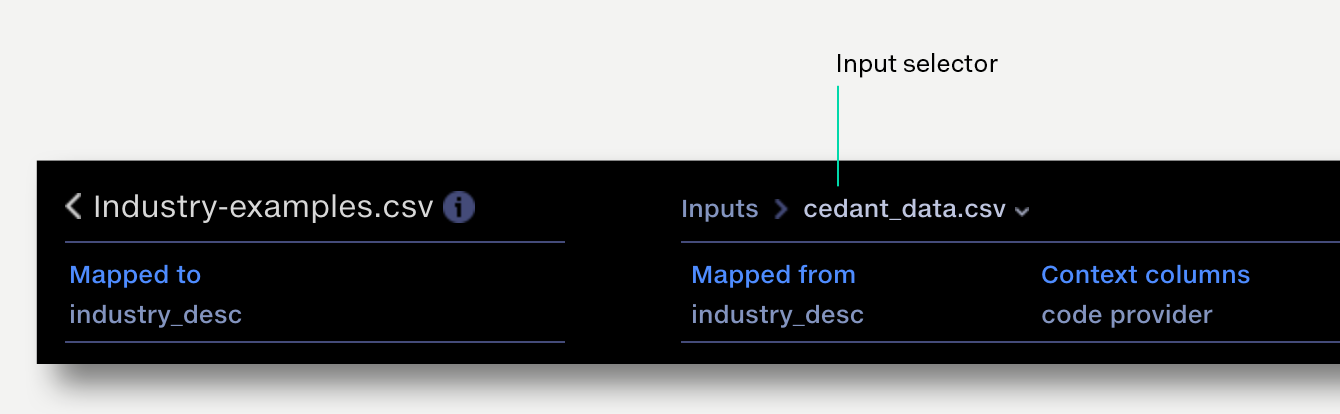
Working with multiple inputs
Operations in Quantemplate can process multiple input datasets simultaneously. If Automap has been run on multiple input datasets, the report will show rows from a single input at a time.
When using multiple inputs, the input selector will be shown, allowing you to switch to view different inputs.
Types of mapping
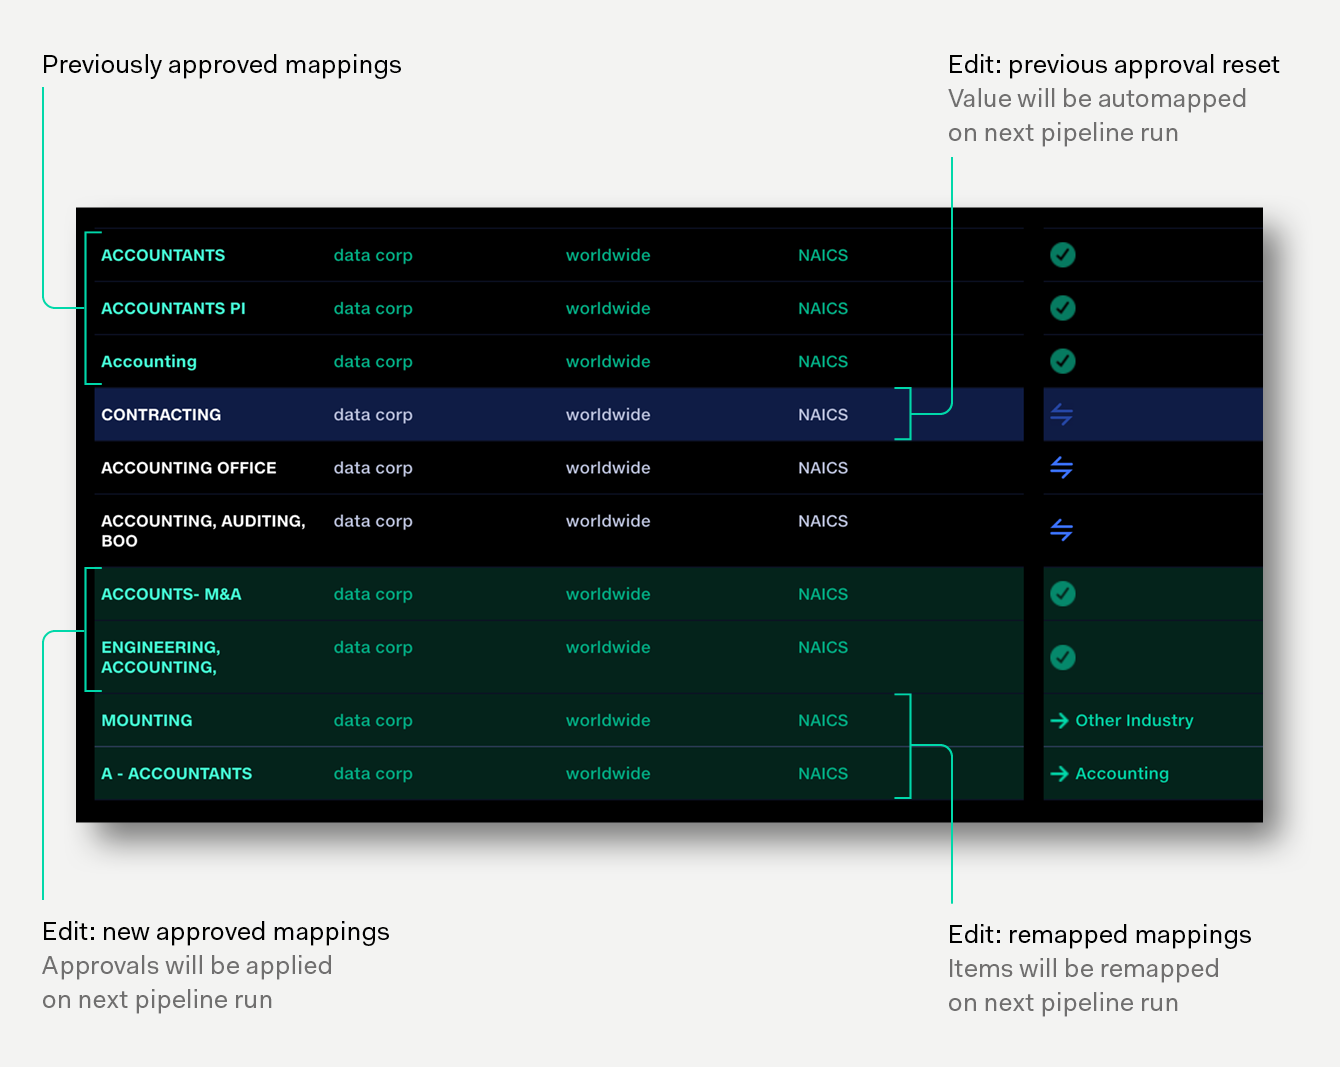
Automapped
Mappings which have been Automapped are indicated by the double-arrow icon above
If a waypoint has been used to create the mapping, the mapping is listed as ‘via (waypoint value)’.
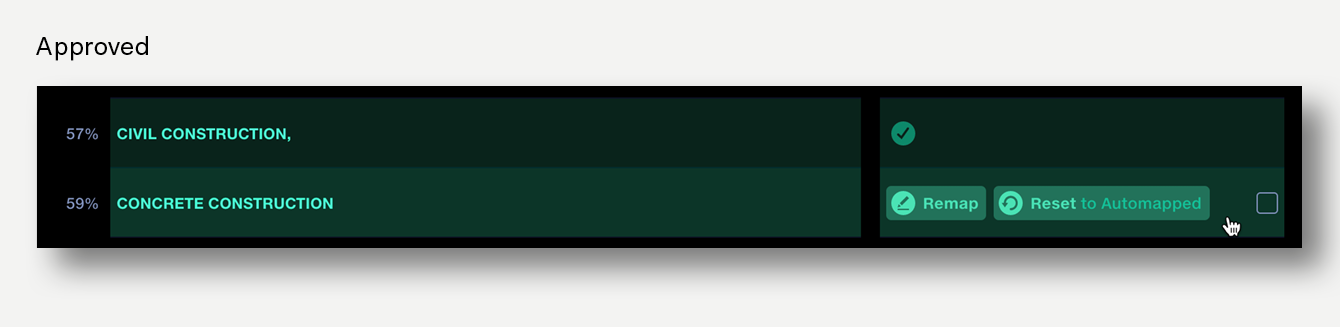
Approved
Mappings which have been reviewed and judged to be correct can be ‘approved’.
Approved mappings are remembered by the pipeline, meaning in the next pipeline run,
they will be mapped to their approved 'map to' value automatically rather than being processed by Automap.
In this way you can incrementally build up a set of high quality approved mappings.
If Waypointing is enabled, approving a mapping will create a new waypoint.
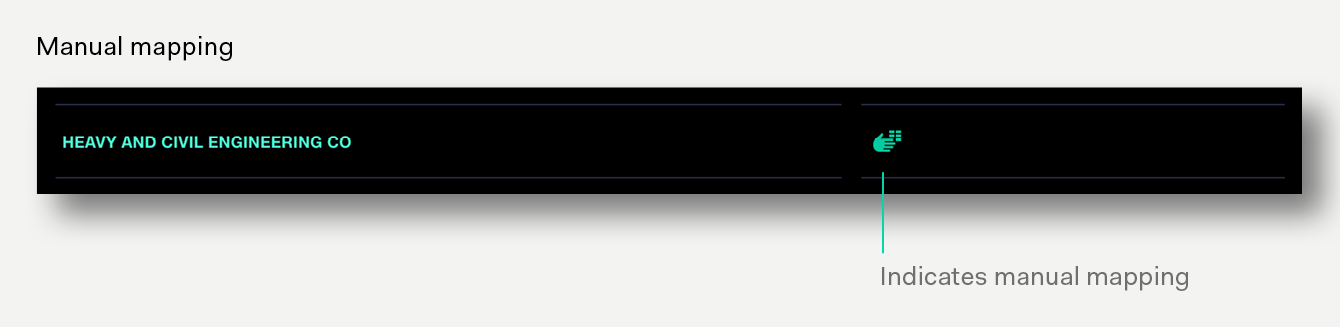
Manual mappings
Mappings which have been configured manually in the map values interface are shown in green with the Map Values icon.
To make changes to a Manual Mapping, open the Map Values operation used to create this Mapping Report.
Manual mappings are classed as approved but are not used as waypoints.
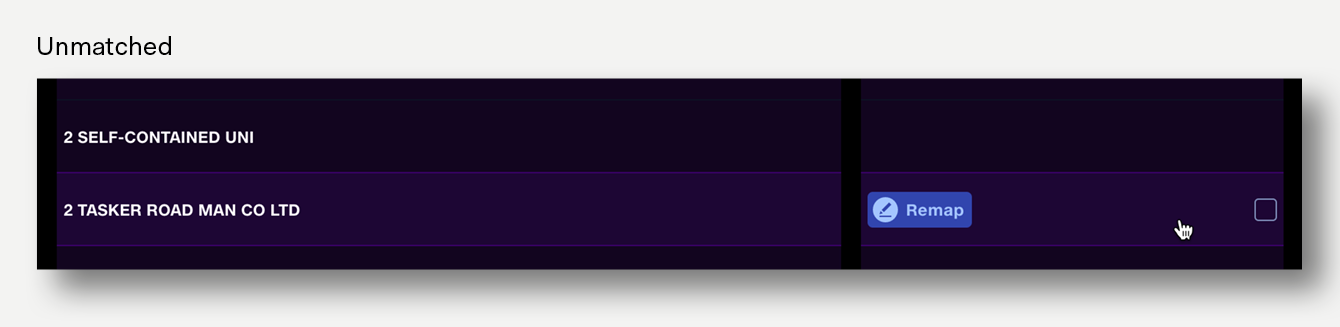
Unmatched items
Unmatched items are items where:
A match to a value in the reference dataset could not be found.
The Automap match strength falls below the minimum strength threshold.
Unmatched items use the setting in Map Values to either retain their original value, or have that value mapped to a single value (e.g. ‘Unknown’).
Unmatched items are shown in purple at the end of the report.
If they have been mapped to a single value, that value is shown on left side of the report, under the unmapped heading.
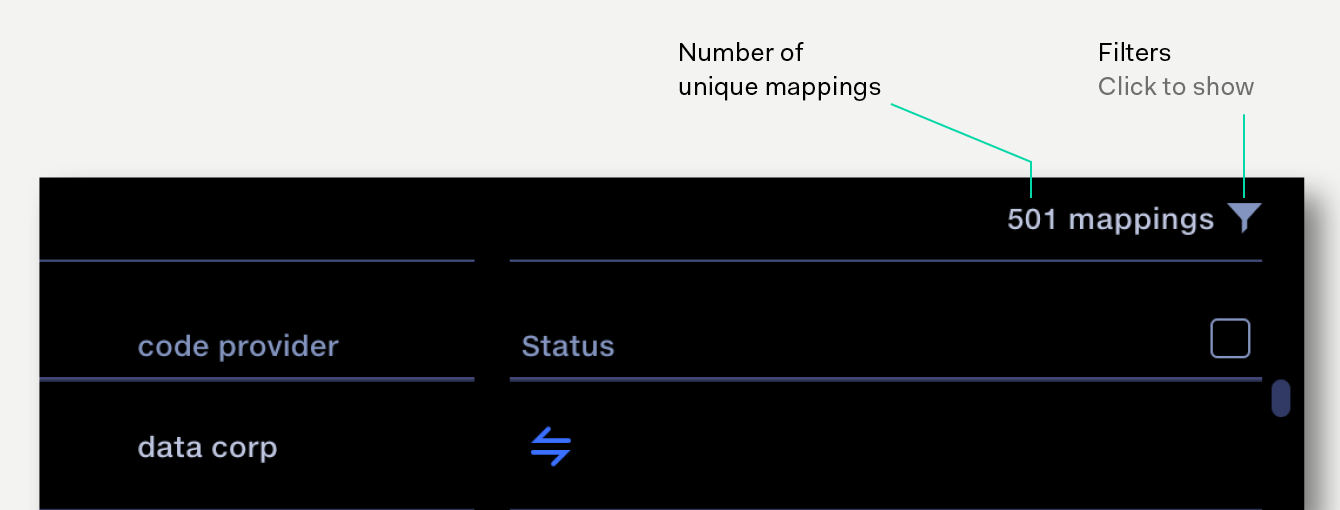
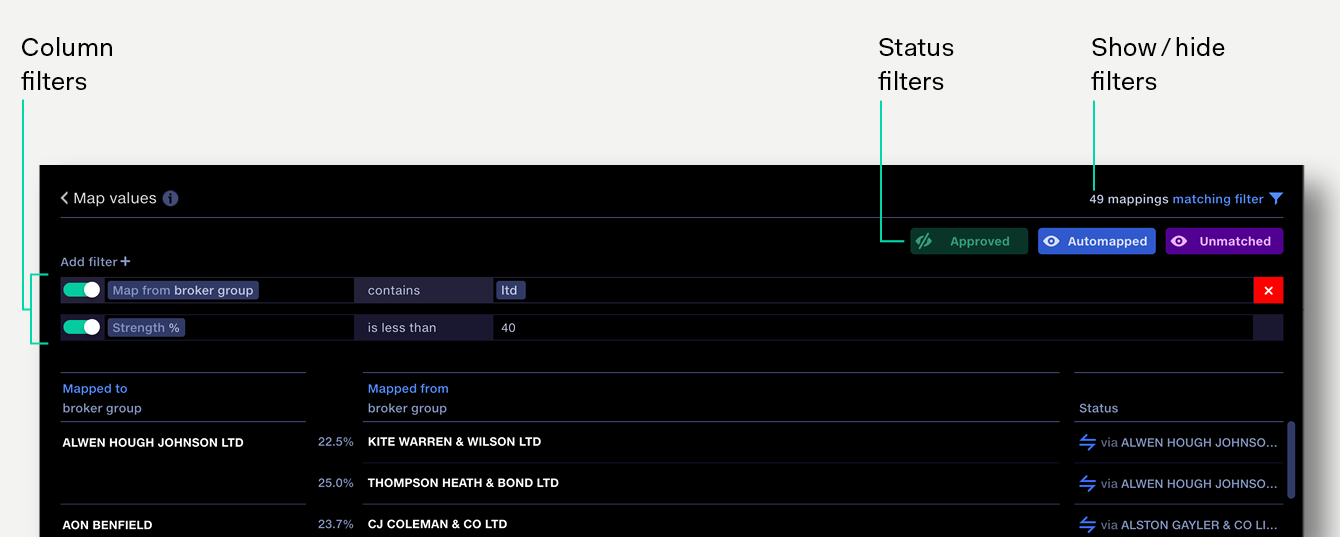
Filtering results
The Mapping Report can be filtered by mapping status or by the values in the columns in the report.
Click on the filter button to reveal the filters.
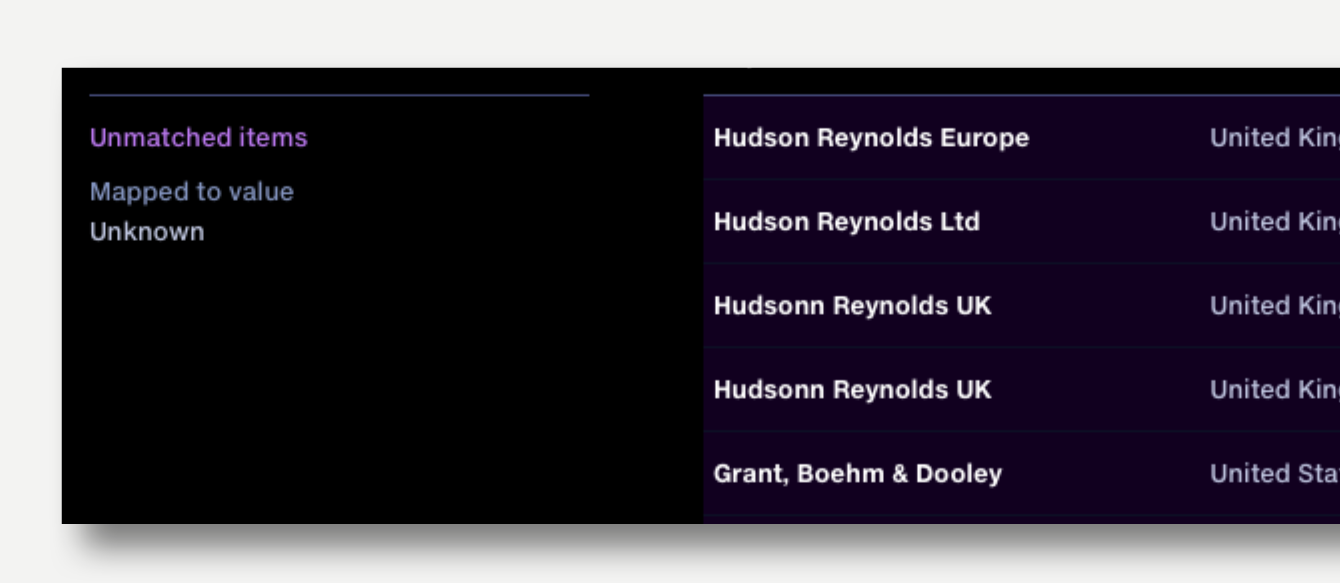
Status filters
Status filters enable you to show or hide mappings in the report, based on their status (Automapped, Approved, or Unmatched).
For example, you can filter out Approved mappings, or show only those which are Unmatched.
By default all statuses are set to showing. Click on a status filter button to hide mappings that have that status.
Click the button again to show the mappings.
Tip
Double-click a status filter button to show only that type of mapping. For example, double click ‘Unmatched’ to hide ‘Approved’ and ‘Automapped’ items.
Note: The status filter ‘Approved’ includes Manual Mappings and Remappings, along with previously approved and newly approved mappings.
Column filters
Column filters allow you to filter on the values in the columns that are used in the report: Map From, Map To, Context Columns and Match Strength.
For example, you could filter the report to show only Mappings for the Map To value ‘Acme‘ with a match strength greater than 80%.
For more guidance on using Quantemplate's filter bars, see Filtering.
A maximum of 10 column filters can be applied to a Mapping Report.
Making and applying changes
Edits are applied on next run
The mapping report allows you to:
Approve mappings so they are remembered for future pipeline runs.
Undo approvals made in the current or previous pipeline runs, including approvals made by others.
Remap ‘map from’ values to a different ‘mapped to’ value.
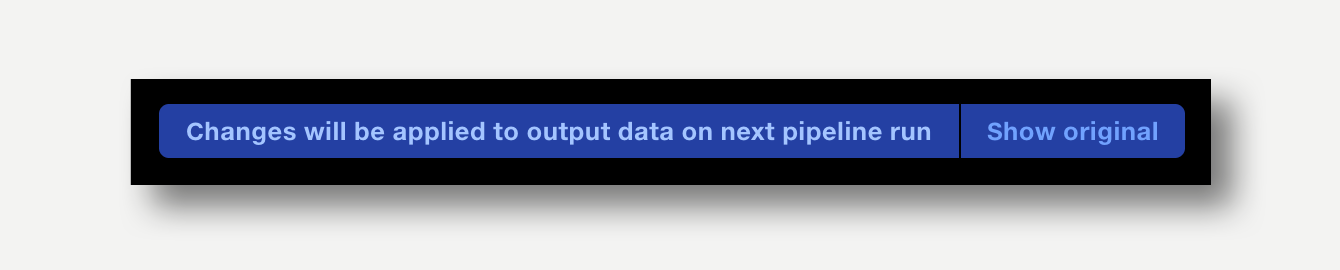
Your changes will be applied to your data the next time the pipeline is run.
Seeing what’s changed
Mappings which have been approved, unapproved or remapped since the last pipeline run are highlighted.
When you make an approval or remapping, a notification appears at the top of the page.
Click ‘Show original’ to show the original version of the report, hiding the changes made since the pipeline was run.
Note:
Any changes made to the report will be applied next time the pipeline is run, even if they have been hidden in the report view.
When showing the report’s original version, edits cannot be made – to make further changes, click ‘Show changes’ in the notification bar.
Reports from previous runs can be viewed but not edited.
Manual mappings can only be edited in the Map Values operation.
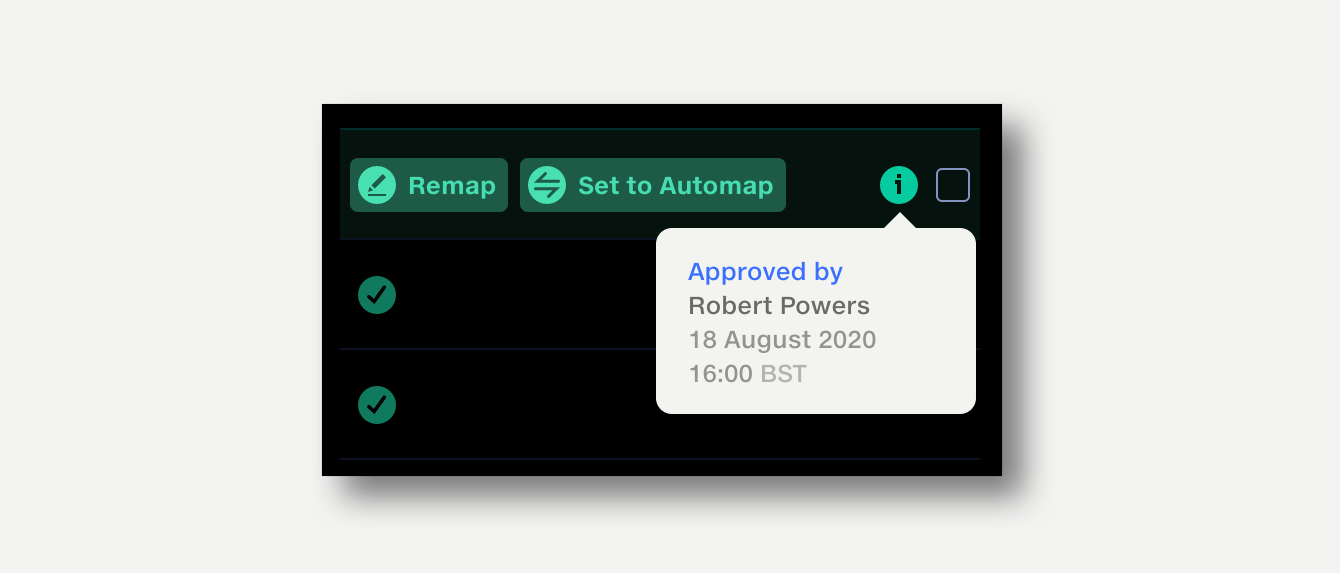
Approving mappings
To approve a mapping, click on the ‘Approve’ button which appears when hovering the cursor over an Automapped row.
The approval will be applied the next time the pipeline is run.
To remove an approval, click on the ‘Reset to Automapped’ button. Approvals which have already been applied in a previous run have a ‘Set to Automap’ button.
In both cases, the item will be considered for automapping on the next pipeline run.
To see who approved a mapping and when, click in the mapping’s info popup.
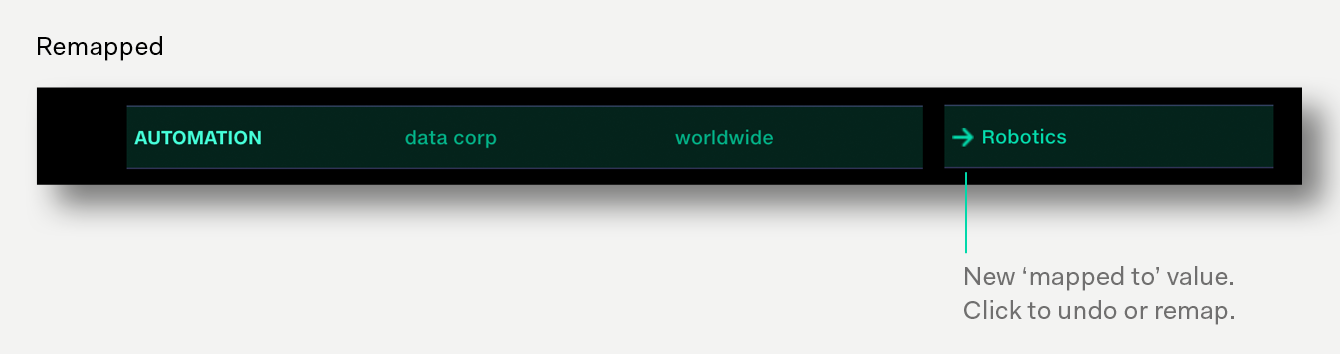
Remapping incorrect results
Incorrect mappings can be remapped to a different value in the reference dataset.
To remap:
Click on the ‘Remap’ button which appears when hovering the cursor over the row.
Select one of the suggested values from the reference dataset. Type in the search field to refine your selection.
The new ‘mapped to’ value is shown in the status column and the item’s status is changed to approved.
An item can be remapped again by clicking the ‘Remap’ button.
To remove a remapping, click the ‘Reset to ...’ button which appears on hovering over the row.
If the desired value does not exist in the reference dataset, a new ‘mapped to’ value can be created:
Click on the ‘Remap’ button which appears when hovering the cursor over row.
Select ‘Create a new mapping’ at the bottom of the suggestions list. The new mapping takes the name of the text entered in the search box.
If no text has been entered, it takes the name of the ‘map-from’ value.
The new ‘mapped to’ value is remembered by the pipeline but is not written to the reference dataset.
If you do not have permission to access the reference dataset, or if the reference dataset ‘mapped-to’ column is missing, suggestions will not be provided.
Select and edit multiple items
Use the bulk selection tools to quickly apply edits to multiple items in the report.
The bulk actions are:
Approve Approve selected items
Remap Remap selected items to another value
Reset Reset selected items to their unedited state (e.g. if an unmatched item has been remapped, reset it to unmatched)
Set to Automap Selected approved and remapped items will be automapped on next run
To edit multiple items:
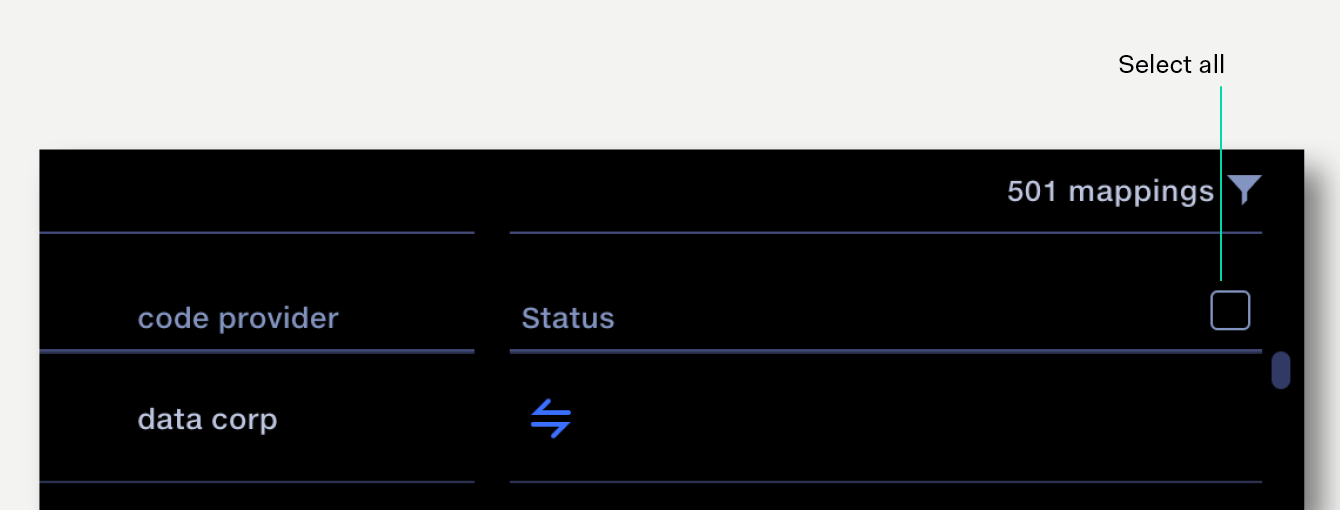
Hover your cursor over a row in the report, a checkbox appears on the right.
Select a checkbox to reveal checkboxes on all rows and show the bulk edit bar above.
Click the checkboxes on more items that you wish to select. Holding shift and clicking on a checkbox will select all rows between that item and the previously selected item.
Click an action in the bulk edit bar to apply that action to all selected rows.
The report shows the first 1,000 items matching any filters which have been applied. To select all the items shown in the report, click the ‘Select all’ checkbox on the top right.
If there are more items than can be shown in a report, then when ‘Select all’ is checked,
the option to select all items in your data that match the filter appears.
Click on the message ‘1,000 selected in report’ then click ‘Select all matches’ in the popup.
The message will change to ‘1,000+ selected’. Now apply the batch action.
Note that the number of items selected excludes manual mappings, so you may see the message ‘999+ selected’ or similar.
Batch actions are processed in the background. Actions applied to thousands of items may take several seconds to complete, so it's advisable to wait a few moments before running a pipeline.
Maximum number of approvals
A single Automap operation allows a maximum of 100,000 approved or remapped items. If you need more approved items in your pipeline, please contact support@quantemplate.com.